Converting an Old MacBook Into an Always-On Personal Kubernetes Cluster
TL;DR: I set up Minikube on an old (2012) MacBook Air and configured it to be able to connect from outside my home network so I would have an always-on Kubernetes cluster at home to experiment with.
Photo Attribution: flickr
Table of Contents:
- Why?
- Power/Cost Considerations
- Process
- 0) Prevent Server System from Sleeping
- 1) Install Minikube on the Server System
- 2) Install
kubectlon the Client System - 3) Add port forwarding rule from the Server System to the Minikube VM
- 4) Update the
.kube/configon the Client to Point to the Server - 5) (Optional) Use DDNS + Router Port Forwarding to Access Outside Local Network
- Conclusion
Why?
Over the past five years, Kubernetes (k8s) has risen to become the de facto standard for managing container orchestration at scale.
However, with many layers of abstraction and [non-trivial costs]({{< ref "/posts/2020/03/managed-kubernetes-comparison/index.md" >}}) to run even the smallest cloud-based cluster, the barriers to entry for an individual who wants to familiarize themselves with Kubernetes can be quite high.
There are a variety of options for running Kubernetes locally including Minikube, Docker Desktop, and Microk8s. These are all good options for aiding in the development process, but all suffer from the fact that they are tied to the power status of the system they are running on (i.e. if I shut down my laptop, the local cluster shuts down too). In order to run workloads that are either time-dependent (cronjobs) or event-driven (asynchronous data processing), it would be much better to have a cluster that is always on.
I happen to have a 2012 MacBook Air sitting around unused now that it is no longer my daily driver. Amazingly, this 8-year-old system has a CPU that supports the necessary software-based virtualization to run a Linux virtual machine where we can install Kubernetes.
Power/Cost Considerations
Because my goal is to achieve a low-cost solution, I wanted to do a quick calculation of how much power this laptop will use if I leave it running 24x7. Based on this environmental spec sheet from apple I estimate the system (with the display off and relatively light workloads) will draw approximately 10W on average.
{{< img "images/mba-power.png" >}}
Pricing Estimate:
  10 (W)
x 1/1000 (W/kW)
x 24 (hrs/day)
x 30.4 (days/month)
x 0.2 ($/kWh)
---
1.44 $/month -- 👍
Process
0) Prevent Server System from Sleeping
Because the MacBook Air is not designed to be used in this configuration, it is necessary to disable sleep using the power management settings (pmset) command line utility. The following commands will make the time to sleep infinite as well as prevent sleeping when there is no display connected:
sudo pmset -a sleep 0;
sudo pmset -a disablesleep 1
1) Install Minikube on the Server System
I followed these instructions (Minikube Installation Instructions) using the VitualBox hypervisor + vm-driver to install Minikube on the MacBook air:
2) Install kubectl on the Client System
I already had kubectl installed on my primary development machine, but you could follow these instructions (Kubectl Installation Instructions) to install it on the system you plan to access the cluster from.
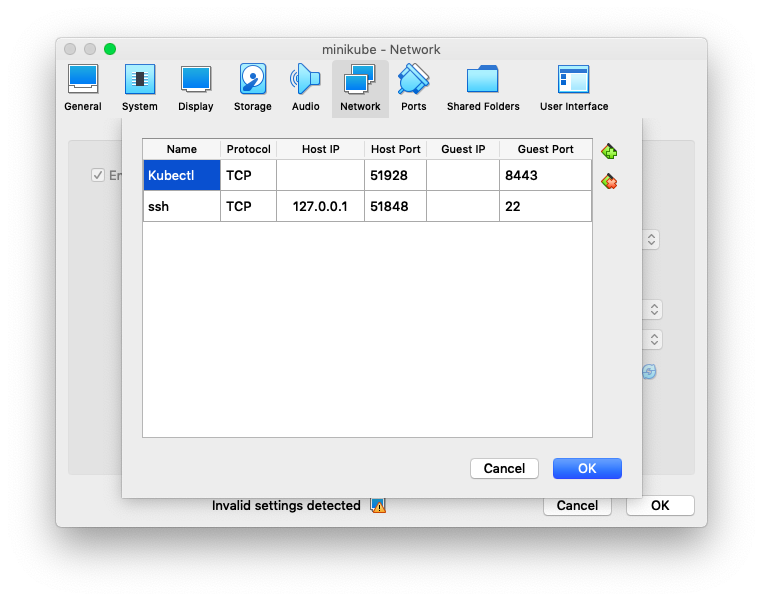
3) Add port forwarding rule from the Server System to the Minikube VM
In order for kubectl commands to make their way to the Minikube cluster, it is necessary to set up a port forwarding rule within the VM configuration to forward requests to port 8443. This can be accomplished via the VirtualBox GUI:
4) Update the .kube/config on the Client to Point to the Server
When executing the minikube start command on the server system, a kubectl context called 'minikube' is added to the kubectl configuration file @ ~/.kube/config:
apiVersion: v1
clusters:
- cluster:
    certificate-authority: <PATH-TO-CONFIG>/.minikube/ca.crt
    server: https://192.168.99.100:8443
  name: minikube
contexts:
- context:
    cluster: minikube
    user: minikube
  name: minikube
current-context: "minikube"
kind: Config
preferences: {}
users:
- name: minikube
  user:
    client-certificate: <PATH-TO-CONFIG>/.minikube/client.crt
    client-key: <PATH-TO-CONFIG>/.minikube/client.key
This configuration needs to be copied onto the client machine (along with the client.crt and client.key files).
I copied those files to <PATH-TO-CONFIG>/.minikube-macbook-air on the client system and updated the kubectl configuration as follows:
apiVersion: v1
clusters:
- cluster:
    insecure-skip-tls-verify: true
    server: https://<INTERNAL-NETWORK-IP>:51928
  name: minikube-macbook-air
contexts:
- context:
    cluster: minikube-macbook-air
    user: minikube-macbook-air
  name: minikube-macbook-air
current-context: "minikube-macbook-air"
kind: Config
preferences: {}
users:
- name: minikube-macbook-air
  user:
    client-certificate: <PATH-TO-CONFIG>/.minikube-macbook-air/client.crt
    client-key: <PATH-TO-CONFIG>/.minikube-macbook-air/client.key
This can either be inserted as a context within the primary .kube/config file or stored as a separate configuration and used by setting the KUBECONFIG environment variable (documentation)
Note: The insecure-skip-tls-verify: true is used because the certificate authority set up by Minikube is not configured to accept incoming requests originating from another system in this way.
5) (Optional) Use DDNS + Router Port Forwarding to Access Outside Local Network
At this point, I was able to connect to the cluster, but only when the Client and Server systems were connected to the same network.
Two additional things needed to be configured to connect from outside of my home network:
- I set up a free dynamic DNS using https://www.dynu.com/. After doing this I replaced
<INTERNAL-NETWORK-IP>with<MY-DDNS-DOMAIN-NAME> - I configured my router to port forward incoming requests on port
51928to the MacBook Air and reserve the IP address for the MAC Address of the machine to ensure it doesn't change.
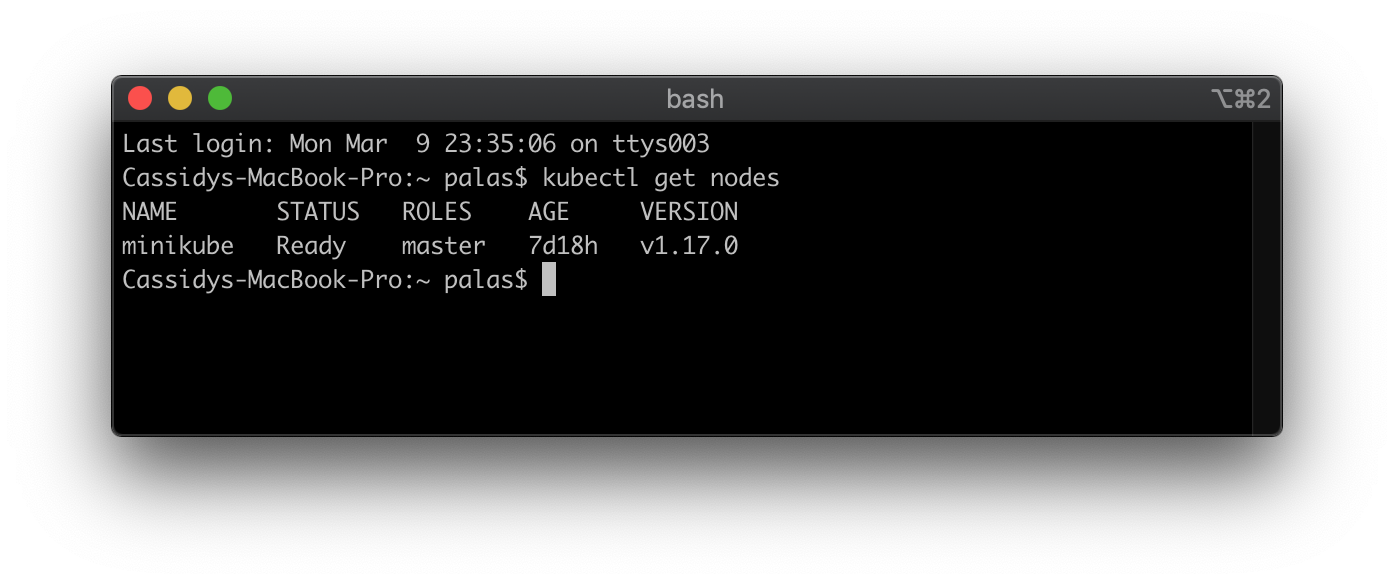
At this point I was able to successfully connect to the cluster from an external network!
Conclusion
There we have it -- For about the price of a McDonald's coffee each month in electricity, I have an always-on Kubernetes cluster (with a single 2 vCPU + 2 GB Memory node) ready for experimentation!
If I didn't happen to have the MacBook Air sitting around, building a home cluster using Raspberry Pis is another popular option (and enables having more than just a single worker node).